
Share a folder in Windows 7
Usually your Outlook data file is named 'outlook.pst' and the default directory is
c:\users\[user name]\appdata\local\microsoft\outlook.
Instead of [user name] you will see the name of your login account.
(e.g. c:\users\tom\appdata\local\microsoft\outlook)
The folder 'c:\users\[user name]\appdata' is hidden by default. So first of all you need to make this folder visible before you can share it.
How do you share this folder so SynchPST can access this folder from the other computer?
Use the built in 'Homegroups'
Setting up Homegroups for File Sharing in Windows 7
One of the most powerful tools available in Windows 7 is the ability to set up a homegroup. With a homegroup users on a home network can share files, print to the same printer, share music, movies and more.
However the only drawback to this homegroup function is that only PC's running Windows 7 can take advantage of it. So in this helpful, handy guide we'll show you how to set up your homegroup for yourself to get started sharing whatever you like amongst your office or household.
The first thing you need to do is to access the desktop and double click on the "My Computer" option. From there across the top should be a bunch of listings "Uninstall a Program," "Control Panel" Etc. You will need to click on the "Control Panel" option. If you cannot find this option, it is available from clicking "Start" then "Control Panel" then "Homegroup".
![]()
This will launch the navigation pane in which the link to Homegroup will appear.
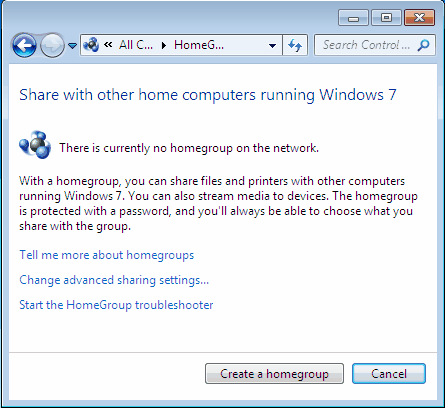
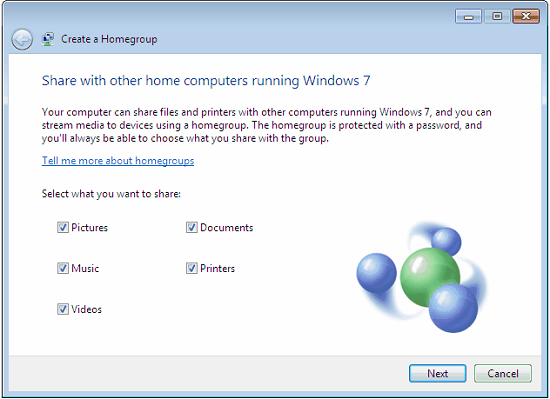
Select the option "Create a Homegroup." Pretty simple for the most part, eh? Next up an menu pane will show up asking what you would like to share on your home network. The options range from pictures, movies, music, documents, etc. Only check those items that you feel comfortable sharing, as everyone else in your household may have access to your bank account details.
The next option that will pop up is an option asking you to input a password for the homegroup.
Every computer and printer that accesses the homegroup will need this password, so be sure to write it down. If you happen to forget it you can always re-access it through the homegroup option under the control panel.
But distribute the password to all the computers in your household that you wish to share with.
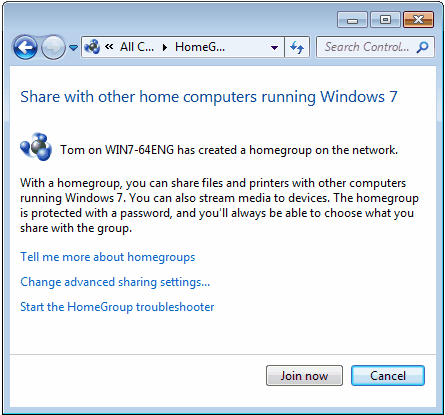
On the other computer open your control panel by clicking 'Start' > 'Control panel'. Then open the 'Homegroups' option.
You will get the hint that there was a homegroup detected on another computer. Click on 'Join now' to get access to the other Homegroup.
In the next step you need to specify what you want to share within your homegroup. Finally you are asked for your homegroup password.
To share an individual folder, you're going to right click on that specific folder, and click the option for 'Share with' > 'Homegroup (Read/Write).
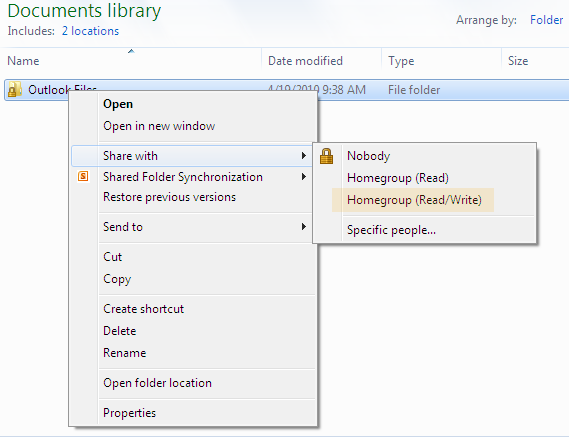
Be careful not to forget what you place in this folder, as everyone will now have access to the file.
Overall the process for setting up and homegroup and sharing folders is a relatively simple one with many benefits.
Now, everyone in your office or household can have access to the same files and printers as everyone else. It is equal rights with computers at it's very best definition.
Now your folder is shared and is accessible from other computers.
Example:
If your computer has the name 'Win7' and you gave your share the name 'Outlook' then the path to the share from another computer is:
\\Win7\Outlook
This tutorial should show you how to share a Folder in Windows 7 with the 'Home Group' functionality.